 Welcome back to another installment of Developing Shopify Apps!
In case you missed the previous articles in this series, they are:
-
Part 1: The Setup. In this article, we:
- Joined Shopify's Partner Program
- Created a new test shop
- Launched a new test shop
- Added an app to the test shop
- Played with a couple of quick API calls through the browser
-
Part 2: Exploring the API. This article covered:
- Shopify's RESTful API, including a quick explanation of how to use it
- Retrieving general information about a shop via the admin panel and the API
- Retrieving information from a shop, such as products, via the API
Exploring RESTful APIs with a REST Console
So far, all we've done is retrieve information from a shop. We did this by using the GET verb and applying it to resources exposed by the Shopify API, such as products, blogs, articles and so on. Of all the HTTP verbs, GET is the simplest to use; you can simply request information by using your browser's address bar. Working with the other three HTTP verbs -- POST, PUT and DELETE -- usually takes a little more work.
One very easy-to-use way to make calls to the Shopify API using all four verbs is a REST client. You have many options, including:
-
cURL: the web developer's Swiss Army knife. This command line utility gets and sends files using URL syntax using a wide array of protocols including HTTP and friends, FTP and similar, LDAPS, TELNET and mail formats including IMAP, POP3 and SMTP.
-
Desktop REST clients such as Fiddler for Windows or WizTools' RESTClient
-
Browser-based REST clients such as RESTClient for Firefox or REST Console for Chrome
Lately, I've been using REST Console for Chrome. It's quite handy -- when installed, it's instantly available with one click on its icon, just to the left of Chrome's "Wrench" menu (which is to the right of the address bar):

And here's what the REST Console looks like -- clean and simple:

Let's try a simple GET operation: let's get the list of products in the shop. The format for the URL is:
-
GET api-key:password@shop-url/admin/products.xml (for the XML version)
-
GET api-key:password@shop-url/admin/products.json (for the JSON version)
where api-key is your app's API key and password is your app's password.
The URL goes into the Request URL field in the Target section. A tap of the GET button at the bottom of the page yields a response, which appears, quite unsurprisingly, in the Response section of the page:

Of course, you could've done this with the address bar. But it's much nicer with the REST Console. Before we start exploring calls that require POST, PUT and DELETE, let's take a look at other things we can do with the GET verb.
Get All the Items!

If you've been following this series of articles, you've probably had a chance to try a couple of GET calls to various resources exposed by the API. Once again, here's the format for the URL that gets you a listing of all the products available in the shop:
Get All the Products
-
GET api-key:password@shop-url/admin/products.xml (for the XML version)
-
GET api-key:password@shop-url/admin/products.json (for the JSON version)
Get All the Articles
If you go to the API documentation and look at the column on the right side of the page, you'll see a list of resources that the Shopify API makes available to you. One of these resources is Article, which gives you access to all the articles in the blogs belonging to the shop (each shop supports one or more blogs; they're a way for shopowners to write about what they're selling or related topics).
Here's how you get all the articles:
-
GET api-key:password@shop-url/admin/articles.xml (for the XML version)
-
GET api-key:password@shop-url/admin/articles.json (for the JSON version)
Get All the Blogs
Just as you can get all the articles, you can get all the blogs that contain them. Here's how you do it:
-
GET api-key:password@shop-url/admin/blogs.xml (for the XML version)
-
GET api-key:password@shop-url/admin/blogs.json (for the JSON version)
Get All the Customers
How about a list of all the shop's registered customers? No problem:
-
GET api-key:password@shop-url/admin/customers.xml (for the XML version)
-
GET api-key:password@shop-url/admin/customers.json (for the JSON version)
Get All the [WHATEVER]
By now, you've probably seen the pattern. For any resource exposed by the Shopify API, the way to get a complete listing of all items in that resource is this:
-
GET api-key:password@shop-url/admin/plural-resource-name.xml (for the XML version)
-
GET api-key:password@shop-url/admin/plural-resource-name.json (for the JSON version)
where:
-
api-key is the app's API key
-
password is the app's password
-
plural-resource-name is the plural version of the name of the resource whose items you want: articles, blogs, customers, products, and so on.
Get a Specific Item, Given its ID
There will come a time when you want to get the information about just one specific item and not all of them. If you know an item's ID, you can retrieve the info for just that item using this format URL:
-
GET api-key:password@shop-url/admin/plural-resource-name/id.xml (for the XML version)
-
GET api-key:password@shop-url/admin/plural-resource-name/id.json (for the JSON version)
To get an article with the ID
3671982, we use this URL:
-
GET api-key:password@shop-url/admin/articles/3671982.xml (for the XML version)
-
GET api-key:password@shop-url/admin/articles/3671982.json (for the JSON version)
If There is Such an Item

If an article with that ID exists, you get a "200" response header ("OK"):
Status Code: 200
Date: Wed, 03 Aug 2011 15:49:44 GMT
Content-Encoding: gzip
P3P: CP="NOI DSP COR NID ADMa OPTa OUR NOR"
Status: 304 Not Modified
X-UA-Compatible: IE=Edge,chrome=1
X-Runtime: 0.114750
Server: nginx/0.8.53
ETag: "fb7cdcc613b1a45698c6cfad05fc7f7e"
Vary: Accept-Encoding
Content-Type: application/xml; charset=utf-8
Cache-Control: max-age=0, private, must-revalidate
...and a response body that should look something like this (if you requested the response in XML):
<?xml version="1.0" encoding="UTF-8"?>
<article>
  <body-html><p>This is your blog. You can use it to write about new product launches, experiences, tips or other news you want your customers to read about.</p> <p>We automatically create an <a href="http://en.wikipedia.org/wiki/Atom_feed">Atom Feed</a> for all your blog posts. <br /> This allows your customers to subscribe to new articles using one of many feed readers (e.g. Google Reader, News Gator, Bloglines).</p></body-html>
  <created-at type="datetime">2011-07-22T14:43:22-04:00</created-at>
  <author>Shopify</author>
  <title>First Post</title>
  <updated-at type="datetime">2011-07-22T14:43:25-04:00</updated-at>
  <blog-id type="integer">1127212</blog-id>
  <summary-html nil="true" />
  <id type="integer">3671982</id>
  <user-id type="integer" nil="true" />
  <published-at type="datetime">2011-07-22T14:43:22-04:00</published-at>
  <tags>ratione, repellat, vero</tags>
</article>
If No Such Item Exists
If no article with that ID exists, you get a "404" response header ("Not Found"). Here's what happened when I tried to retrieve an article with the ID 42. I used this URL:
-
api-key:password@shop-url/admin/articles/3671982.xml (for the XML version)
-
api-key:password@shop-url/admin/articles/3671982.json (for the JSON version)
I got this header back:
Status Code: 404
Date: Wed, 03 Aug 2011 16:00:25 GMT
Content-Encoding: gzip
Transfer-Encoding: chunked
Status: 404 Not Found
Connection: keep-alive
X-UA-Compatible: IE=Edge,chrome=1
X-Runtime: 0.039715
Server: nginx/0.8.53
Vary: Accept-Encoding
Content-Type: application/xml; charset=utf-8
Cache-Control: no-cache<
...and since there was nothing to return, the response body was empty.
Get [WHATEVER], Given its ID
The same principle applies to any other Shopify API resource.
Want the info on a customer whose ID is 50548602? The URL would look like this:
-
GET api-key:password@shop-url/admin/customers/50548602.xml (for the XML version)
-
GET api-key:password@shop-url/admin/customers/50548602.json (for the JSON version)
...and if such a customer exists, you'll get a response of a "200" header and the customer's information in the body, similar to what you see below (the following is the JSON response):
{
    "customer": {
        "accepts_marketing": true,
        "orders_count": 0,
        "addresses": [{
            "company": null,
            "city": "Wilkinsonshire",
            "address1": "95692 O'Reilly Plains",
            "name": "Roosevelt Colten",
            "zip": "27131-3440",
            "address2": null,
            "country_code": "US",
            "country": "United States",
            "province_code": "NH",
            "phone": "1-244-845-7291 x258",
            "last_name": "Colten",
            "province": "New Hampshire",
            "first_name": "Roosevelt"
        }],
        "tags": "",
        "id": 50548602,
        "last_name": "Colten",
        "note": null,
        "email": "ivory@example.com",
        "first_name": "Roosevelt",
        "total_spent": "0.00"
    }
}
If no such customer existed, you'd get a "404" response header and an empty response body.
How about info on a product whose ID is 48143272? Here's the URL you'd use:
-
GET api-key:password@shop-url/admin/products/48143272.xml (for the XML version)
-
GET api-key:password@shop-url/admin/products/48143272.json (for the JSON version)
Once again: if such a product exists, you'll get a "200" response header and a response body that looks something like this (this is the XML version):
<?xml version="1.0" encoding="UTF-8"?>
<product>
    <product-type>Snowboard</product-type>
    <handle>burton-custom-freestlye-151</handle>
    <created-at type="datetime">2011-08-02T12:06:42-04:00</created-at>
    <body-html><strong>Good snowboard!</strong></body-html>
    <title>Burton Custom Freestlye 151</title>
    <template-suffix nil="true" />
    <updated-at type="datetime">2011-08-02T12:06:42-04:00</updated-at>
    <id type="integer">48143272</id>
    <vendor>Burton</vendor>
    <published-at type="datetime">2011-08-02T12:06:42-04:00</published-at>
    <tags />
    <variants type="array">
        <variant>
            <price type="decimal">10.0</price>
            <position type="integer">1</position>
            <created-at type="datetime">2011-08-02T12:06:42-04:00</created-at>
            <title>First</title>
            <requires-shipping type="boolean">true</requires-shipping>
            <updated-at type="datetime">2011-08-02T12:06:42-04:00</updated-at>
            <inventory-policy>deny</inventory-policy>
            <compare-at-price type="decimal" nil="true" />
            <inventory-management nil="true" />
            <taxable type="boolean">true</taxable>
            <id type="integer">112957692</id>
            <grams type="integer">0</grams>
            <sku />
            <option1>First</option1>
            <option2 nil="true" />
            <fulfillment-service>manual</fulfillment-service>
            <option3 nil="true" />
            <inventory-quantity type="integer">1</inventory-quantity>
        </variant>
        <variant>
            <price type="decimal">20.0</price>
            <position type="integer">2</position>
            <created-at type="datetime">2011-08-02T12:06:42-04:00</created-at>
            <title>Second</title>
            <requires-shipping type="boolean">true</requires-shipping>
            <updated-at type="datetime">2011-08-02T12:06:42-04:00</updated-at>
            <inventory-policy>deny</inventory-policy>
            <compare-at-price type="decimal" nil="true" />
            <inventory-management nil="true" />
            <taxable type="boolean">true</taxable>
            <id type="integer">112957702</id>
            <grams type="integer">0</grams>
            <sku />
            <option1>Second</option1>
            <option2 nil="true" />
            <fulfillment-service>manual</fulfillment-service>
            <option3 nil="true" />
            <inventory-quantity type="integer">1</inventory-quantity>
        </variant>
    </variants>
    <images type="array" />
    <options type="array">
        <option>
            <name>Title</name>
        </option>
    </options>
</product>
You can apply this pattern for retrieving items with specific IDs to other resources in the API.
Creating a New Item

Let's quickly look over the HTTP verbs and how they're applied when working with Shopify's RESTful API:
| Verb |
How it's used |
| GET |
"Read". In the Shopify API, the GET verb is used to get information about shops and related things such as customers, orders, products, blogs and so on.
GET operations are most often used to get a list of items ("Get me a list of all the products my store carries"), an individual item ("Get me the customer with this particular ID number) or to conduct a search ("Get me a list of the products in my store that come from a particular vendor"). |
| POST |
"Create". In the Shopify API, the POST verb is used to create new items: new customers, products and so on. |
| PUT |
"Update". To modify an existing item using the Shopify API, use the PUT verb. |
| DELETE |
"Delete". As you might expect, the DELETE verb is used to delete objects in the Shopify API. |
To create a new item with the Shopify API, use the POST verb and this pattern for the URL:
-
POST api-key:password@shop-url/admin/plural-resource-name.xml (for the XML version)
-
POST api-key:password@shop-url/admin/plural-resource-name.json (for the JSON version)
Creating a new item also requires providing information about that item. The type of information varies with the item, but it's always in either XML or JSON format, and it's always provided in the request body.

Let's create a new customer (or more accurately, a new customer record). Here's what we know about the customer:
-
First name: Peter
-
Last name: Griffin
-
Email: peter.lowenbrau.griffin@giggity.com
-
Street address: 31 Spooner Street, Quahog RI 02134
-
Phone: 555-555-1212
This is enough information to create a new customer record (I'll cover the customer object, as well as all the others, in more detail in future articles). Here's that same information in JSON, in a format that the API expects:
{
  "customer": {
    "first_name": "Peter",
    "last_name": "Griffin",
    "email": "peter.lowenbrau.griffin@giggity.com",
    "addresses": [{
        "address1": "31 Spooner Street",
        "city": "Quahog",
        "province": "RI",
        "zip": "02134",
        "country": "US",
        "phone": "555-555-1212"
    }]
  }
}
Since I've got the customer info in JSON format, I'll use the JSON URL for this API call:
POST api-key:password@shop-url/admin/customers.json
Here's how we make the call using Chrome REST Console. The URL goes into the Request URL field of the Target section:

...while the details of our new customer go into the RAW Body field of the Body section. Make sure that the Content-Type field has the correct content-type selected; in this case, since we're sending (and receiving) JSON, the content-type should be application/json:

A press of the POST button at the bottom of the page sends the information to the server, and the results are displayed in the Response section:
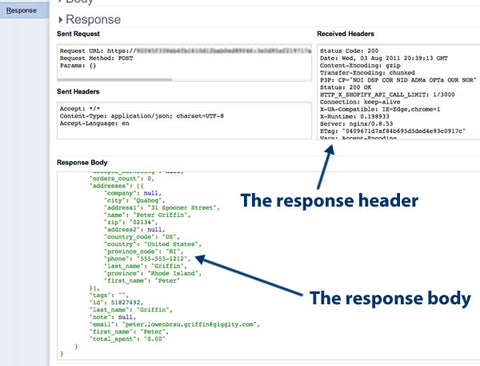
Here's the response header:
Status Code: 200
Date: Wed, 03 Aug 2011 20:39:13 GMT
Content-Encoding: gzip
Transfer-Encoding: chunked
P3P: CP="NOI DSP COR NID ADMa OPTa OUR NOR"
Status: 200 OK
HTTP_X_SHOPIFY_API_CALL_LIMIT: 1/3000
Connection: keep-alive
X-UA-Compatible: IE=Edge,chrome=1
X-Runtime: 0.198933
Server: nginx/0.8.53
ETag: "0409671d7af84b695d5ded4e93c0917c"
Vary: Accept-Encoding
Content-Type: application/json; charset=utf-8
Cache-Control: max-age=0, private, must-revalidate
HTTP_X_SHOPIFY_SHOP_API_CALL_LIMIT: 1/300
The "200" status code means that the operation was successful and we have a new customer in the records.
Here's the body of the response, which is the complete record of the customer we just created, in JSON format:
{
    "customer": {
        "accepts_marketing": null,
        "orders_count": 0,
        "addresses": [{
            "company": null,
            "city": "Quahog",
            "address1": "31 Spooner Street",
            "name": "Peter Griffin",
            "zip": "02134",
            "address2": null,
            "country_code": "US",
            "country": "United States",
            "province_code": "RI",
            "phone": "555-555-1212",
            "last_name": "Griffin",
            "province": "Rhode Island",
            "first_name": "Peter"
        }],
        "tags": "",
        "id": 51827492,
        "last_name": "Griffin",
        "note": null,
        "email": "peter.lowenbrau.griffin@giggity.com",
        "first_name": "Peter",
        "total_spent": "0.00"
    }
}
Let's create another new item. This time, we'll make it a product and we'll do it in XML.

Let's say this is the information we have about the product:
-
Title: Stumpy Pepys Toy Drum SP-1
-
Vendor: Spinal Tap
-
Product type: Drum
-
Description: This drum is so good...you can't beat it!
Here's that same information in XML, in a format that the API expects:
<?xml version="1.0" encoding="UTF-8"?>
<product>
  <body-html>This drum is so good...<strong>you can't beat it!!</strong></body-html>
  <product-type>drum</product-type>
  <title>Stumpy Pepys Toy Drum SP-1</title>
  <vendor>Spinal Tap</vendor>
</product>
(As I wrote earlier, I'll cover the product object and all its fields in an upcoming article.)
Since I've got the product info in JSON format, I'll use the XML URL for this API call:
POST api-key:password@shop-url/admin/customers.json
Let's make the call using the Chrome REST Console again. The URL goes into the Request URL field of the Target section:

...while the details of our new product go into the RAW Body field of the Body section. Make sure that the Content-Type field has the correct content-type selected; in this case, since we're sending (and receiving) XML, the content-type should be application/xml:

Once again, a press of the POST button at the bottom of the page sends the information to the server, and the results appear in the Response section:

Here's the response header:
Status Code: 201
Date: Wed, 03 Aug 2011 22:20:17 GMT
Transfer-Encoding: chunked
Status: 201 Created
HTTP_X_SHOPIFY_API_CALL_LIMIT: 1/3000
Connection: keep-alive
X-UA-Compatible: IE=Edge,chrome=1
X-Runtime: 0.122462
Server: nginx/0.8.53
Content-Type: application/xml; charset=utf-8
Location: https://nienow-kuhlman-and-gleason1524.myshopify.com/admin/products/48339792
Cache-Control: no-cache
HTTP_X_SHOPIFY_SHOP_API_CALL_LIMIT: 1/300
Don't sweat that the code is 201 and not 200 -- all 2xx code mean success. I'm going to go bug the core team and ask why successfully creating a new customer gives you a 200 (OK) code and successfully creating a new product gives you 201 (created).
Here's the response body -- it's the complete record of the product we just created, in XML format:
<?xml version="1.0" encoding="UTF-8"?>
<product>
    <product-type>drum</product-type>
    <handle>stumpy-pepys-toy-drum-sp-1</handle>
    <created-at type="datetime">2011-08-03T18:20:17-04:00</created-at>
    <body-html>This drum is so good...<strong>you can't beat it!!</strong></body-html>
    <title>Stumpy Pepys Toy Drum SP-1</title>
    <template-suffix nil="true" />
    <updated-at type="datetime">2011-08-03T18:20:17-04:00</updated-at>
    <id type="integer">48339792</id>
    <vendor>Spinal Tap</vendor>
    <published-at type="datetime">2011-08-03T18:20:17-04:00</published-at>
    <tags />
    <variants type="array">
        <variant>
            <price type="decimal">0.0</price>
            <position type="integer">1</position>
            <created-at type="datetime">2011-08-03T18:20:17-04:00</created-at>
            <title>Default</title>
            <requires-shipping type="boolean">true</requires-shipping>
            <updated-at type="datetime">2011-08-03T18:20:17-04:00</updated-at>
            <inventory-policy>deny</inventory-policy>
            <compare-at-price type="decimal" nil="true" />
            <inventory-management nil="true" />
            <taxable type="boolean">true</taxable>
            <id type="integer">113348882</id>
            <grams type="integer">0</grams>
            <sku />
            <option1>Default</option1>
            <option2 nil="true" />
            <fulfillment-service>manual</fulfillment-service>
            <option3 nil="true" />
            <inventory-quantity type="integer">1</inventory-quantity>
        </variant>
    </variants>
    <images type="array" />
    <options type="array">
        <option>
            <name>Title</name>
        </option>
    </options>
</product>
Next Time...
In the next installment, we'll look at modifying and deleting existing objects in your shop.
Continue reading


 Welcome back to another installment of Developing Shopify Apps!


 Let's get the same information that we got from the admin panel's General Settings page, but using the API this time. In order to do this, we need to know two things:


