How to Implement a Secure Central Authentication Service in Six Steps
Share
As Shopify merchants grow in scale they will often introduce multiple stores into their organization. Previously, this meant that staff members had to be invited to multiple stores to setup their accounts. This introduced administrative friction and more work for the staff users who had to manage multiple accounts just to do their jobs.
We created a new service to handle centralized authentication and user identity management called, surprisingly enough, Identity. Having a central authentication service within Shopify was accomplished by building functionality on the OpenID Connect (OIDC) specification. Once we had this system in place, we built a solution to reliably and securely allow users to combine their accounts to get the benefit of single sign-on. Solving this specific problem involved a team comprising product management, user experience, engineering, and data science working together with members spread across three different cities: Ottawa, Montreal, and Waterloo.
The Shop Model
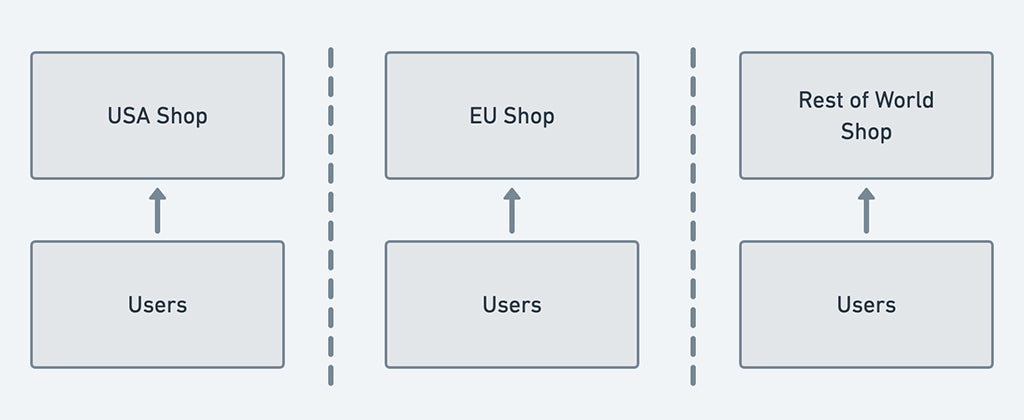
Shopify is built so that all the data belonging to a particular store (called a Shop in our data model) lives in a single database instance. The data includes core commerce objects like Products, Orders, Customers, and Users. The Users model represents the staff members who have access, with specific permissions, to the administration interface for a particular Shop.

Shop Commerce Object Relationships
User authentication and profile management belonged to the Shop itself and worked as long as your use of Shopify never went beyond a single store. As soon as a Merchant organization expanded to using multiple stores, the experience for both the person managing store users and the individual users involved more overhead. You had to sign into each store independently as there was no single sign-on (SSO) capabilities because Shops don’t share any data between each other. The users had to manage their profile data, password, and two-step authentication on each store they had access to.

Shop isolation of users
Modelling User Accounts Within Identity
User accounts modelled within our Identity service are two important types: Identity accounts and Legacy accounts. A service or application that a user can access via OIDC is modelled as a Destination within Identity. Examples of destinations within Shopify would be stores, the Partners dashboard, or our Community discussion forums.
A Legacy account only has access to a single store and an Identity account can be used to access multiple destinations.

Legacy account model: one destination per account. can only access Shops
We ensured that new accounts are created as Identity accounts and that existing users with legacy accounts can be safely and securely upgraded to Identity accounts. The big problem was combining multiple legacy accounts together. When a user has the same email to sign into several different Shopify stores we combined these accounts together into a single Identity account without blocking their access to any of the stores they used.

Combined account model: each account can have access to multiple destinations
There were six steps needed to get us to a single account to rule them all.
- Synchronize data from existing user accounts into a central Identity service.
- Have all authentication go through the central Identity service via OpenID Connect.
- Prompt users to combine their accounts together.
- Prompt users to enable a second factor (2FA) to protect their account.
- Create the combined Identity account.
- Prevent new legacy accounts from being created.
1. Synchronize Data From Existing User Accounts Into a Central Identity Service
We ensured that all user profile and security credential information was synchronized from the stores, where it's managed, into the centralized Identity service. This meant synchronizing data from the store to the Identity service every time one of the following user events occurred
- creation
- deletion
- profile data update
- security data update (password or 2FA).
2. Have All Authentication Go Through the Central Identity Service Via OpenID Connect (OIDC)
OpenID Connect is an extension to the OpenID 2.0 specification and the method used to delegate authentication from the Shop to the Identity service. Prior to this step, all password and 2FA verification was done within the core Shop application runtime. Given that Shopify shards the database for the core platform by Shop, all of the data associated with a given Shop is available on a single database instance.
One downside with having all authentication go through Identity is that when a user first signs into a Shopify service it requires sending the user’s browser to Identity to perform an OIDC authentication request (AuthRequest), so there is a longer delay on initial sign in to a particular store.

Users signing into Shopify got familiar with this loading spinner
3. Prompt Users to Combine Their Accounts Together
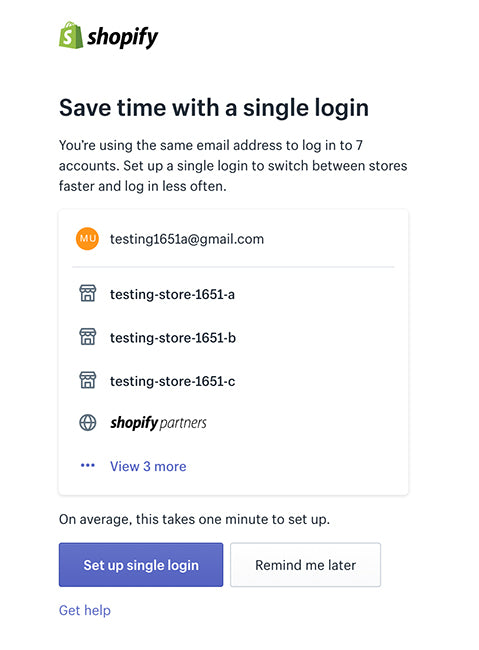
Users with an email address that can sign into more than one single Shopify service are prompted to combine their accounts together into a single Identity account. When a legacy user is signing into a Shopify product we interrupt the OIDC AuthRequest flow, after verifying they were authenticated but before sending them to their destination, to check if they had accounts that could be upgraded.
There were two primary upgrade paths to an Identity account for a user: auto-upgrading a single legacy account or combining multiple accounts.
Auto-upgrading a single legacy account occurs when a user’s email address only has a single store association. In this case, we convert the single account into an Identity account retaining all of their profile, password, and 2FA settings. Accounts in the Identity service are modelled using single table inheritance with a type attribute specifying which class a particular record uses. Upgrading a legacy account in this case was as simple as updating the value of this type attribute. This required no other changes anywhere else within the Shopify system because the universally unique identifier (UUID) for the account didn't change and this is the value used to identity an account in other systems.
Combining multiple accounts is triggered when a user has more than one active account (legacy or Identity) that uses the same email address. We created a new session object, called a MergeSession, for this combining process to keep track of all the data required to create the Identity account. The MergeSession was associated to an individual AuthRequest which means that when the AuthRequest was completed, the session would no longer be active. If a user went through more than a single combining process we would have to generate a new MergeSession object for each one.

The prompt users saw when they had multiple accounts that could be combined
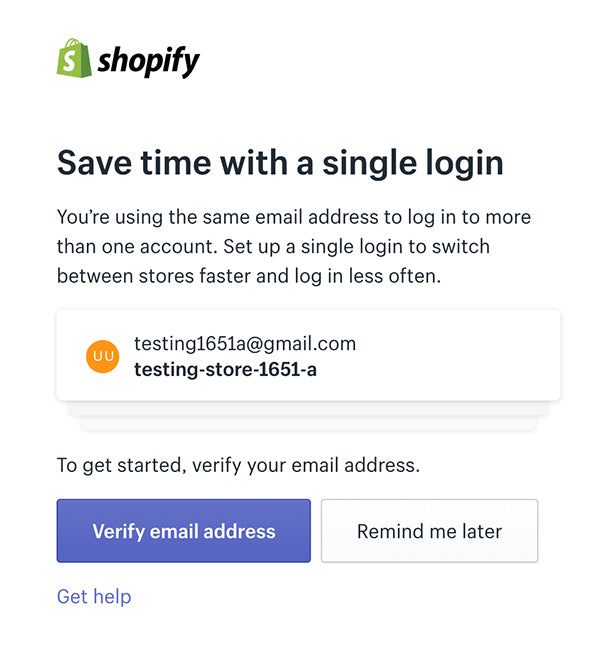
Shopify doesn't require users to verify their email address when creating a new store. This means it’s possible that someone could sign up for a trial using an email address they don’t have access to. Because of this we need to verify that you have access to the email address before we show a user information about other accounts with the same email or allow you to take any actions on those other accounts. This verification involves you requesting an email be sent to your address with a link.
If the user’s email address on the store they were signing in to was verified, we list all of the other destinations where their email address was used. If a user hadn't verified their email address for the account they are authenticating into then we would only indicate that there were other accounts and they must verify their email address before proceeding with combining them.

The prompt users saw when they signed in with an unverified email address
If any of the accounts that need combining use 2FA then the user had to provide a valid code for each required account. When someone uses SMS as a 2FA method, they could potentially save some time in this step if they use the same phone number across multiple accounts because we only require a single code for all of the destinations that use the same number. This was a secure convenience to our users in an attempt to reduce time spent on this step. Individuals using an authenticator app (e.g. Google Authenticator, Authy, 1Password, etc.), however, had to provide a code per destination because the authenticator app is configured per user account and there’s nothing associating them to one another.
If a user couldn’t provide a 2FA code for any accounts other than the account they are signing into, they are able to exclude that account from being combined. Legitimate reasons why a person may be unable to provide a code include if the account uses an old SMS phone number that the person no longer has access to or the person no longer has an authenticator app configured to generate a code for that account.
The idea here is that any account which was excluded can be combined at a later date when the user re-gains access to the account.
Once the 2FA requirements for all accounts are satisfied we prompt the user to setup a new password for their combined account. We store the encrypted password hash on an object that is keeping track of state for this session.
4. Prompt Users to Enable a Second Factor to Protect Their Account
Having a user engaged in performing account maintenance was an excellent opportunity to expose them to the benefits of protecting their account with a second factor of security. We displayed a different flow to users who already had 2FA enabled on at least one of their accounts being combined as the assumption was they don’t require explanation about what 2FA is but someone who had never set it up most likely would.
5. Create the Combined Identity Account
Once a user had validated their 2FA configuration of choice, or opted out of setting it up, we performed the following actions:
Attach 2FA setup, if present, to an object that keeps track of the specific account combination session (MergeSession).

Merge session object with new password and 2FA configuration.
Inside a single database transaction create the complete new account, associate destinations from legacy accounts to it, and delete the old accounts
We needed to do this inside a transaction after getting all of the information from a user to prevent the potential for reducing the security of their accounts. If a user was using 2FA before starting this process and we created the Identity account immediately after the new password was provided, there exists a small window of time when their new Identity account would be less secure than their old legacy accounts. As soon as the Identity account exists and has a password associated with it, it could be used to access destinations with only knowledge of the password. Deferring account creation until both password and 2FA are defined means that the new account can be as secure as the ones being combined were.

Final state of combined account
Generate a session for the new account and use it to satisfy the AuthRequest that initiated this session in the first place.
Some of the more complex pieces of logic for this process included finding all of the related accounts for a given email address and the information about the destinations they had access to, replacing the legacy accounts when creating the Identity account, and ensuring that the Identity account was setup correctly with all of the required data defined correctly. For these parts of the solution we relied on a Ruby library called ActiveOperation. It's a very small framework allowing you to isolate and model business logic within your application in an operation class. Traditionally in a Rails application you end up having to put logic either in your controllers or models and in this case we were able to have controllers and models that were very small by defining the complex business logic as operations. These operations were easily testable given that they were isolated and had very specific responsibilities that each separate class was responsible for.
There are other libraries for handling this kind of business logic process but we chose ActiveOperation because it was easy to use, made our code easier to understand, and had built-in support for the RSpec testing framework we were using.
We added support for the new Web Authentication (WebAuthn) standard in our Identity service just as we were beginning to roll out the account combining flow to our users. This meant that we were able to allow users to use physical security keys as a second factor when securing their accounts rather than just the options of SMS or an authenticator app.
6. Prevent New Legacy Accounts From Being Created
We didn’t want any more legacy accounts created. There were two user scenarios that needed to be updated to use the Identity creation flow: signing up for a new trial store on shopify.com and inviting new staff members to an existing store.
When signing up for a new store you would enter your email address as part of that process. This email address was used as the primary owner for the new store. With legacy accounts even if the email address belonged to another store we’d still be creating a new legacy account for the newly created store.
When inviting a new staff member to your store you would enter the email address for the new user and an invite would be sent that email address that includes a link to accept the invite and finish setting up their account. Similarly to the store creation process, this would always be a new legacy account on each individual store.
In both cases with the new process we determine whether the email address belongs to an Identity account already and, if so, require the user to be authenticated for the account belonging to that email address before they can proceed.
Build New Experiences for Shopify Users That Rely on SSO Identity Accounts
As of the time of this writing over 75% of active user accounts have been auto-upgraded or combined into a single Identity account. Accounts that don’t require user interaction, such as accounts that can be auto-upgraded, can be done automatically without the user signing in. The accounts that require a user to prove ownership of their accounts can only be combined when logging in. At some point in the future we will prevent users from signing into Shopify without having an Identity account.
When product teams within Shopify can rely on our active users having Identity accounts we can start building new experiences for those users that delegate authentication and profile management to the Identity service. Authorization is still up to the service leveraging these Identity accounts as Identity specifically only handles authentication and knows nothing about the permissions within the services that the accounts can access.
For our users, it means that they don’t have to create and manage a new account when Shopify launches a new service that utilizes Identity for user sign in.
If this sounds like the kind of problems you want to solve, we're always on the lookout for talent and we’d love to hear from you. Visit our Engineering career page to find out about our open positions.